
Wisp Science使用技巧:研究历程,让每一天的探索都有迹可循
查看原文上周那张图是怎么得到的?当时为什么选择方案 B?昨天的实验没有成功,今天应该从哪一步继续?
研究往往同时发生在几段对话、几次运行和不同版本的文件里。到了组会或写论文的时候,我们需要把它们重新接起来:哪天做了什么,留下了哪份结果,依据是什么,还有哪些问题没有验证。
Wisp Science v1.11.0 的主题是 Research Journey · 研究历程。这一篇从首页研究日历出发,带你回到项目中的一天,查看成果来源、补充研究记录,再把选中的证据放进论文工作区。
本文适用于 v1.11.0。截图来自 Wisp Science 实际前端,使用固定日期和模拟数据演示操作,无需连接模型或服务器。文件、实验与结论均为教学示例;论文页面使用另一组独立的演示证据,不表示前面的结果已自动转入论文。
先分清三个入口
| 入口 | 适合回答的问题 |
|---|---|
| 首页「研究日历」 | 这一天,哪些项目留下了研究记录? |
| 项目侧栏「研究历程」 | 这个项目最近做了什么?产物对应哪次运行? |
| 对话中的「轨迹」 | 这一段对话具体调用了什么工具、执行了哪一步? |
如果需要检查一次工具调用的参数或报错,继续看 轨迹教程。研究历程把视角放到项目和日期,帮助你回顾跨对话的工作。
第一步:从日历找到当天的工作
打开 Wisp 的项目首页,点击右上角、收藏图标左侧的日历图标。
研究日历默认显示本月和今天。左侧可以选择所有项目或单个项目,中间按日期显示活动标记,右侧按项目列出当天记录;窄窗口会把详情放在日历下方。
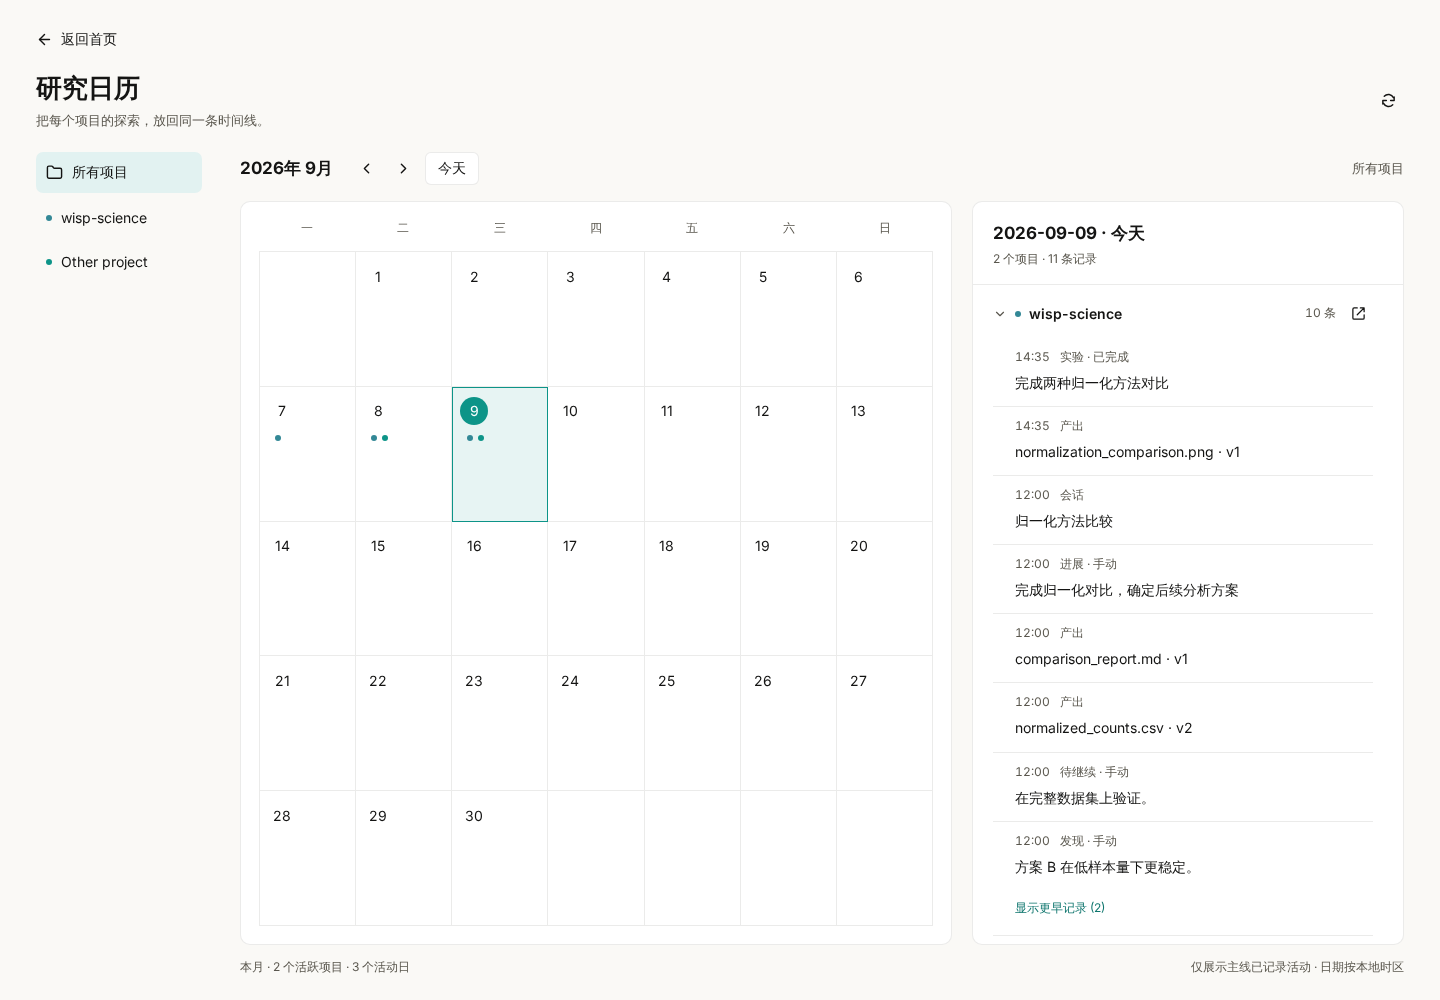
可以按这个顺序试一遍:
- 点击一个有活动标记的日期,查看当天涉及哪些项目。
- 点击左侧项目,缩小到自己要回顾的研究。
- 记录较多时,在当天详情中展开项目、点击「显示更早记录」。
- 点击详情中项目标题右侧的打开图标,进入该项目所选日期的研究历程。
月份箭头可以查看过去,「今天」回到当前日期。日历记录的是已经发生并登记的活动,不是未来任务排期;活动日数也不代表研究完成度。隐私模式隐藏的项目不会出现在汇总里。
第二步:在项目里读懂一天的研究
也可以直接打开项目,点击左侧研究历程。从侧栏进入时,默认显示本月,最近有活动的一天展开;从首页日历进入时,则定位到刚才选择的日期。
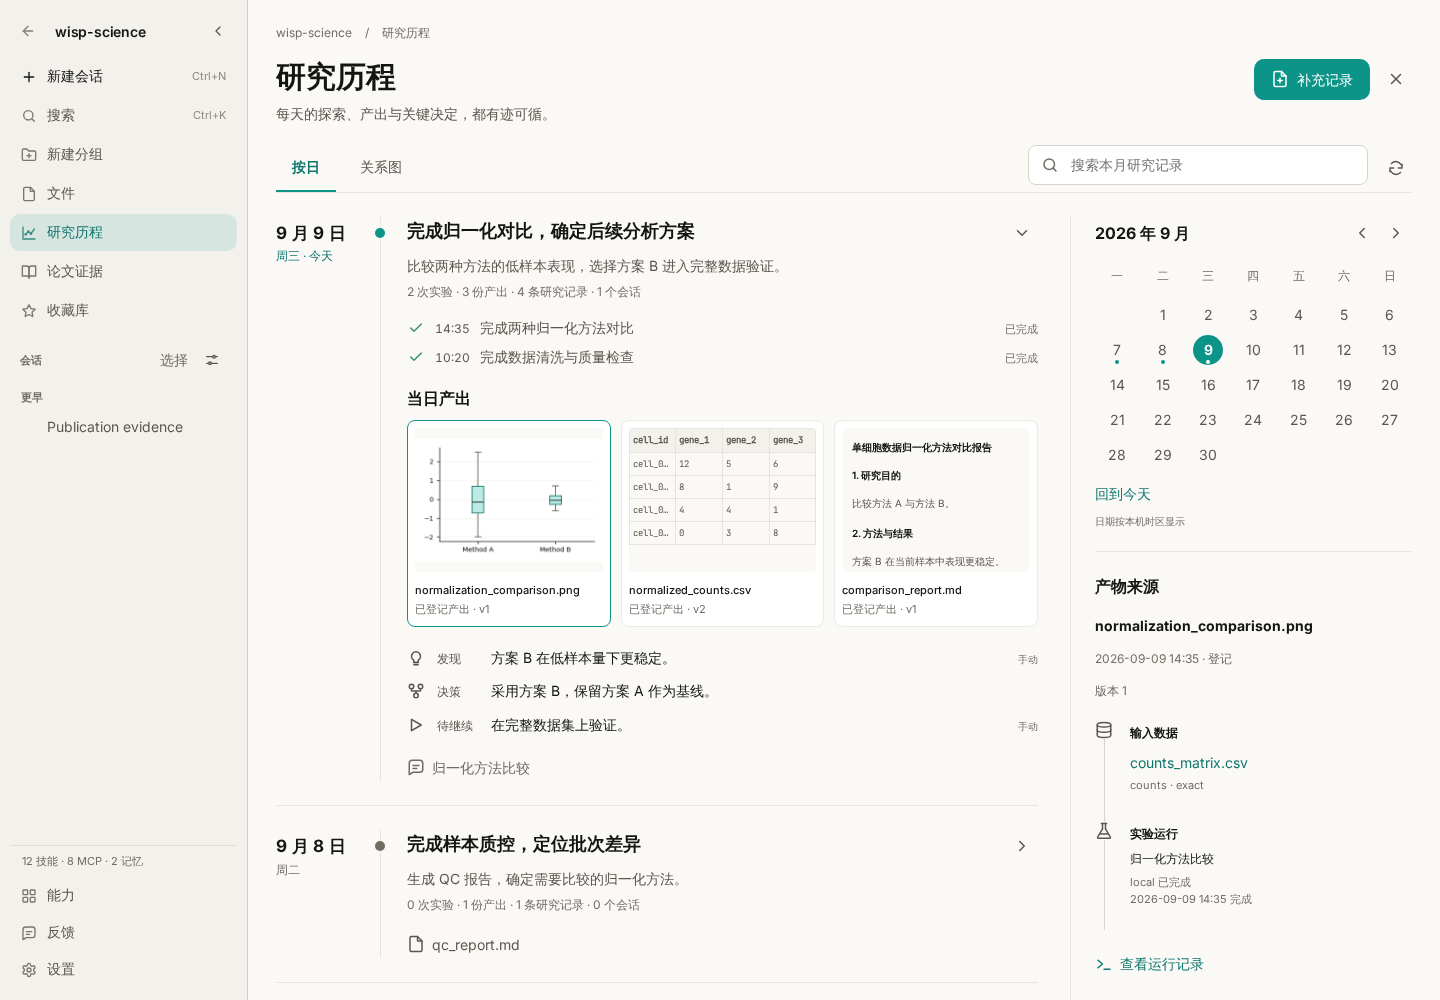
示例中,三天的工作依次是导入原始数据、完成质控、比较归一化方法。当天卡片把实验、产物、人工记录和对话放在一起,便于回顾前后关系。
这里的记录来自项目已有内容:会话、运行、登记过的产物、文献、数据资产、决策,以及手动补充的笔记。失败或取消的运行也可以留下记录,因为“这条路为什么没有走通”同样有价值。
点击右侧日历查看某一天,点击「显示整月」恢复月视图。搜索框只搜索当前已经载入的范围,不会自动遍历所有月份。找不到旧记录时,先切到对应月份或日期;页面提示读取不完整时,可以缩小到某一天。
第三步:从一份结果追到它的来源
假设组会上要使用 normalized_counts.csv。仅凭文件名,还不能确定它对应的是哪一次分析。
点击当天产物中的这个文件,右侧来源栏会显示所选历史版本、对应的生成运行,以及已登记的输入。
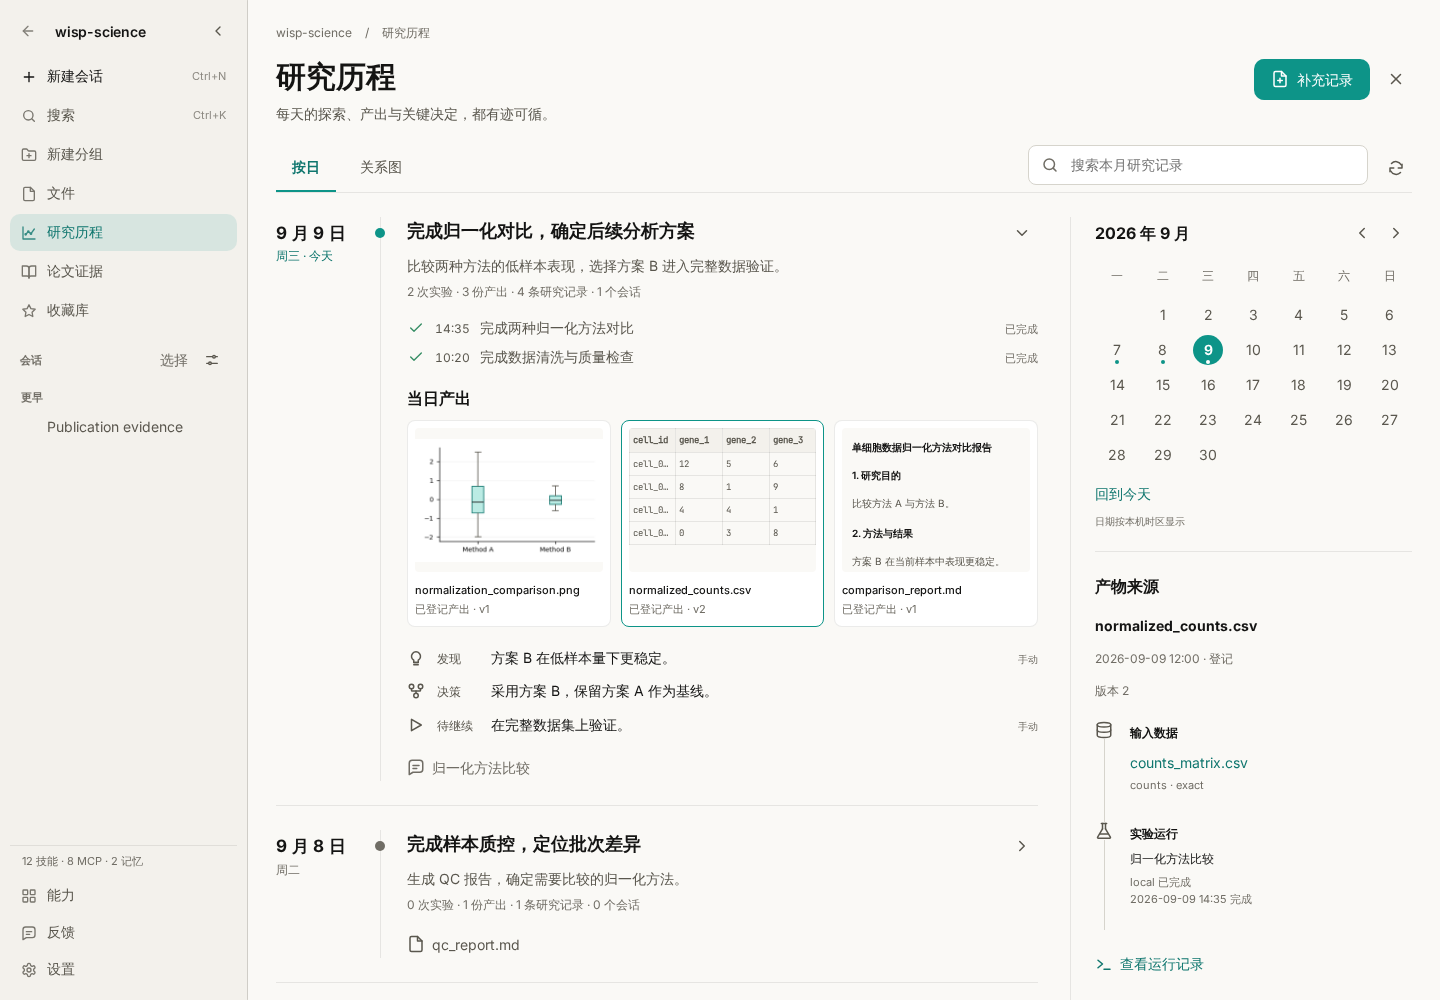
重点核对三件事:
- 版本:这里是当天登记的具体版本;文件后来更新,不会把历史卡片悄悄换成新版。
- 输入和运行:确认是否使用了预期数据。点击「查看运行记录」,可查看状态、命令、执行环境和日志尾部。
- 实际内容:点击「打开产物」,查看该版本的内容,而不只依赖标题或说明。
来源信息取决于已有登记。页面显示“未记录”时,就不能据此推断输入或生成过程完整。今天才登记的历史文件,也不会自动变成几天前的实验产出。
按 Escape 会先关闭最上层的产物预览或运行详情,之后才退出研究历程。
第四步:把判断和下一步写下来
运行日志能说明执行了什么,但“为什么选择这个方法”“哪些结论还不确定”通常需要研究者补充。
点击右上角补充记录,选择研究日期和记录类型,再填写标题与详情。
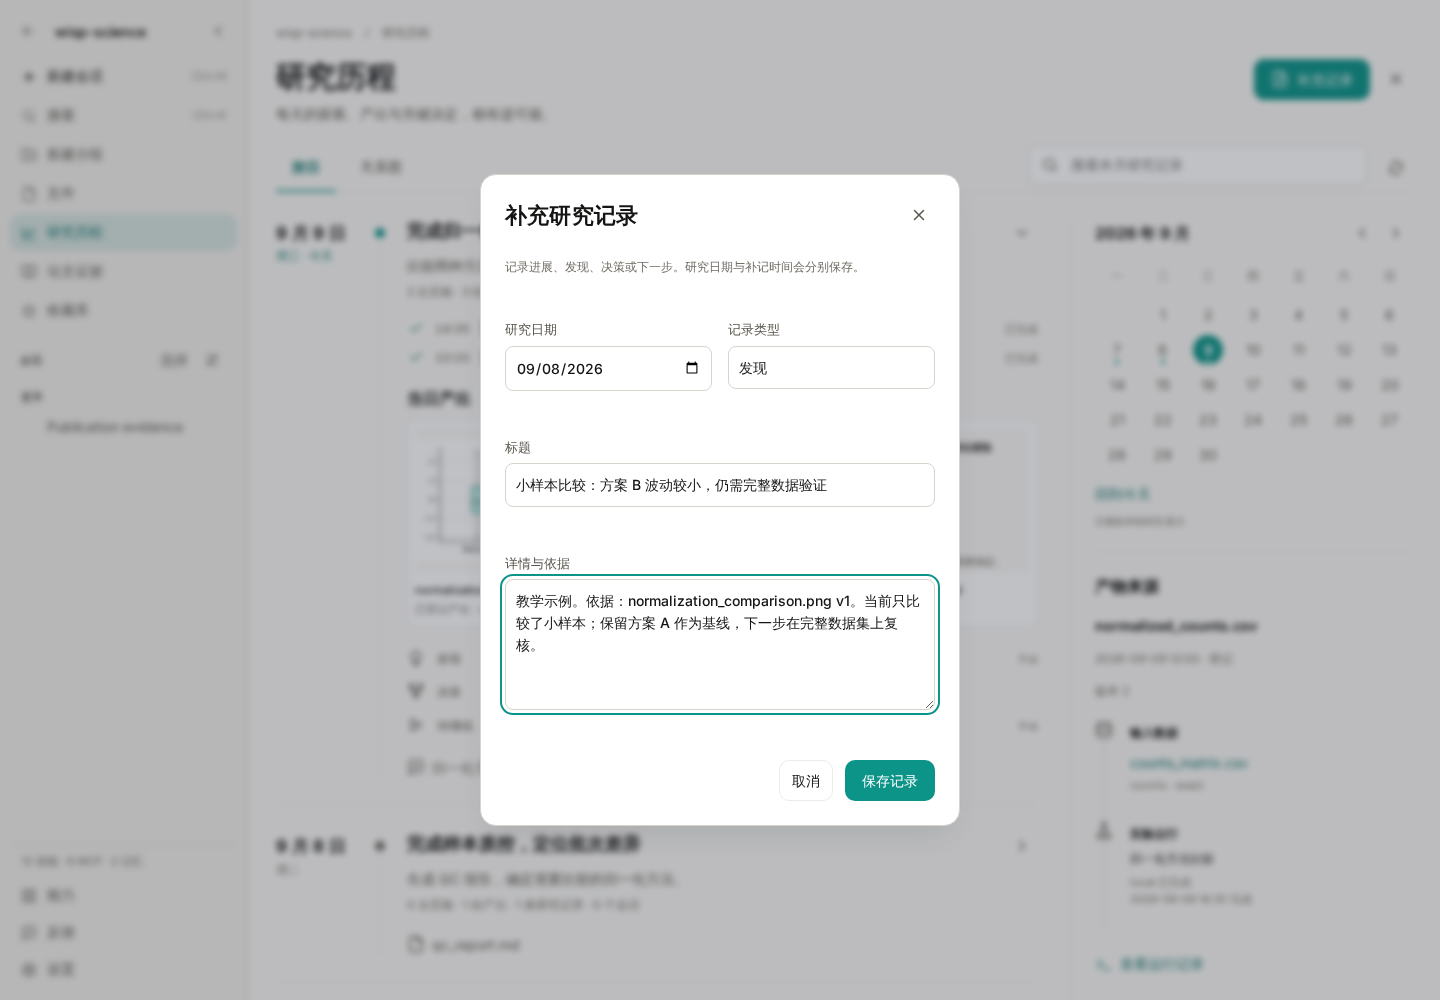
四种类型分别是进展、发现、决策和待继续。可以参考下面这条发现记录:
标题:小样本比较:方案 B 波动较小,仍需完整数据验证
详情与依据:教学示例。依据:normalization_comparison.png v1。当前只比较了小样本;保留方案 A 作为基线,下一步在完整数据集上复核。
一条有用的记录,最好写清观察到了什么、依据在哪、还有什么没验证。保存后,它会出现在所选研究日期下;如果是补记,系统还会保留实际保存时间。
人工记录不会自动获得科学验证。目前也没有记录编辑或删除入口,保存前检查日期与表述。
第五步:写论文时,挑选真正支撑论点的证据
需要把研究成果用于论文时,关闭研究历程,进入项目侧栏的论文证据。
这里按论文组织证据:左侧是章节、论点或图表等条目,右侧展示选中的结果、分析来源,以及用途和选择理由。页面另有「定稿检查」和「版本记录」。
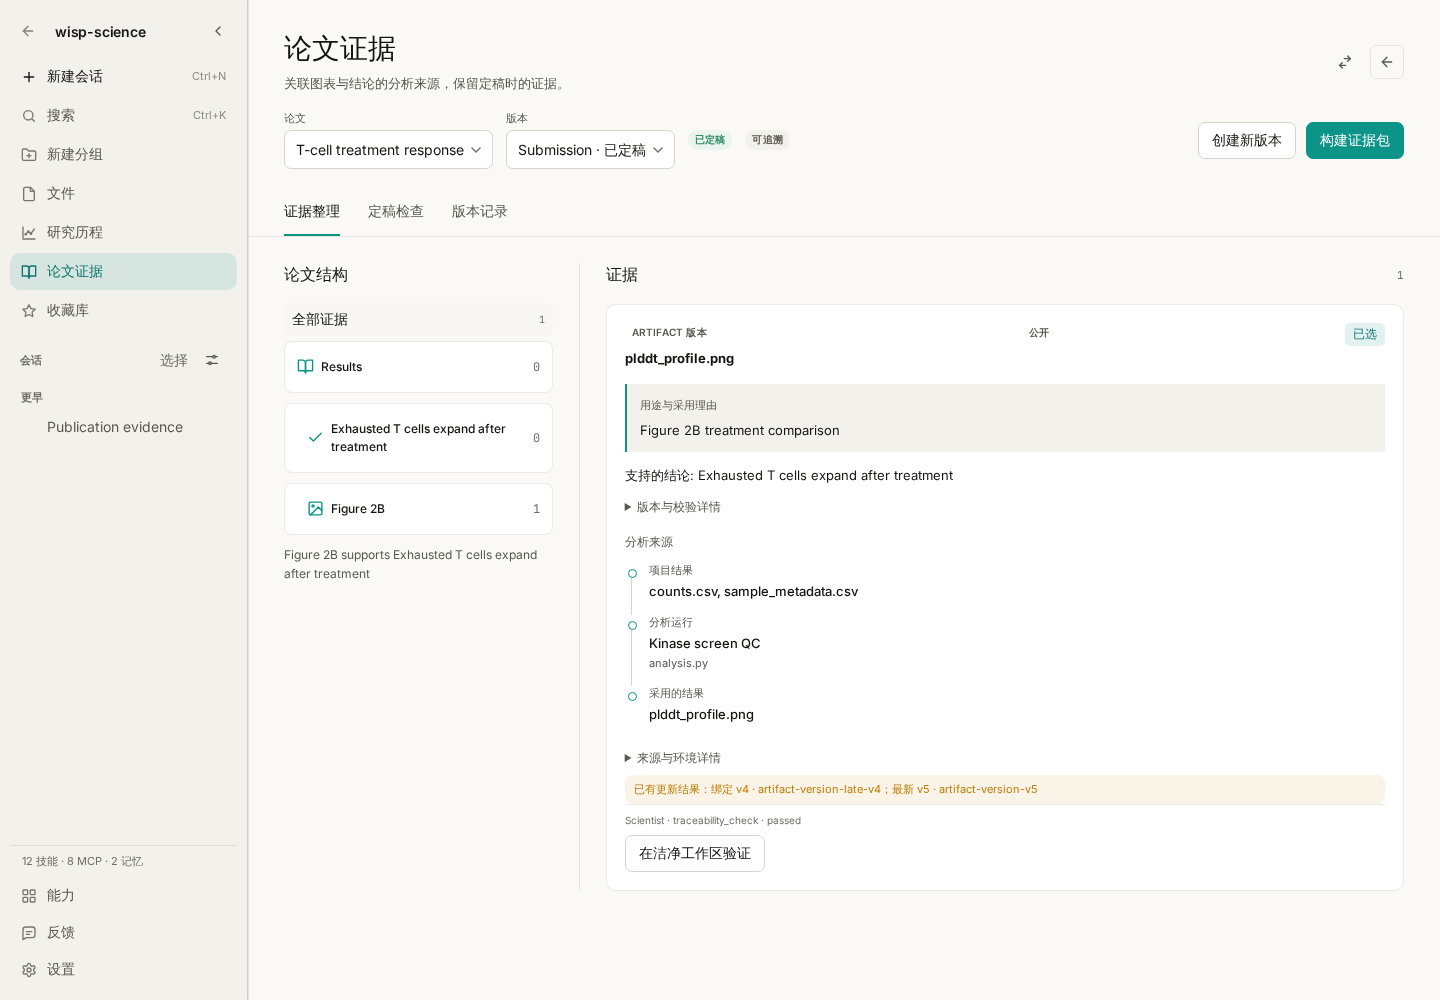
对一份可编辑的草稿,可以这样开始:
- 创建或选择论文及草稿版本,添加需要支持的章节、论点或图表条目。
- 点击「添加证据」,从已登记结果、分析运行或已保存的研究对话中选择来源。
- 写明证据用途、选择状态,以及必要的选择理由。对话来源可以选取一段原文,文件来源绑定所选准确版本。
- 在「定稿检查」中先检查当前版本,处理提示。通过后,再明确确认锁定证据。
检查通过不会自动锁定草稿;锁定需要单独操作。查看旧版本时打开的是已保存的历史修订;继续修改时克隆一个新版本。前面的日历和笔记,也不会自动替你选好论文证据。
更详细的版本、证据包和验证规则,见 论文证据工作区说明。
一个可以每天重复的小习惯
开始工作时,从日历回顾昨天,找到尚未验证的问题。结束工作前,打开今天的研究历程,核对关键产物的版本和来源,再补一条包含依据与下一步的记录。
准备组会或论文时,就可以沿着日期回到原始成果,查看当时的运行与判断。它能保留的上下文,仍取决于你实际登记了哪些结果、输入和笔记;它不会自动生成每日科学总结,也不会把目录里的所有文件都当作研究成果。
让每一天的探索,都有迹可循。
项目与下载:Wisp Science · v1.11.0
How did you produce last week's figure? Why did you choose method B? Yesterday's experiment failed; where should you pick up today?
Research often spans several conversations, runs, and file versions. Before a lab meeting or while writing a paper, you need to reconnect them: what happened on a particular day, which results it produced, what supported your decisions, and what still needs validation.
The theme of Wisp Science v1.11.0 is Research Journey. This tutorial starts at the home research calendar, takes you into a project's daily history, and shows how to inspect sources, add research notes, and organize selected evidence for a manuscript.
This tutorial applies to v1.11.0. Screenshots show the actual Wisp Science frontend with a fixed date and simulated data; no model or server connection is needed. Files, experiments, and findings are teaching examples. The publication screenshot uses a separate demonstration dataset; it does not imply that the earlier results were transferred automatically.
Three views to know
| View | The question it helps answer |
|---|---|
| Research calendar on the Projects home | Which projects recorded activity on this date? |
| Research journey in the project sidebar | What happened in this project, and which run produced an output? |
| A conversation's trajectory | Which tools did this conversation call, and what happened at each step? |
To inspect tool arguments or an error, see the trajectory tutorial. Research Journey provides the project and date view for reviewing work across conversations.
Step 1: Find the day's work in the calendar
Open the Projects home and click the calendar icon at the upper right, to the left of the Library icon.
The calendar opens at the current month and today. Choose all projects or a single project on the left, inspect activity markers in the middle, and read the day's records grouped by project on the right. Narrow windows place the details below the calendar.
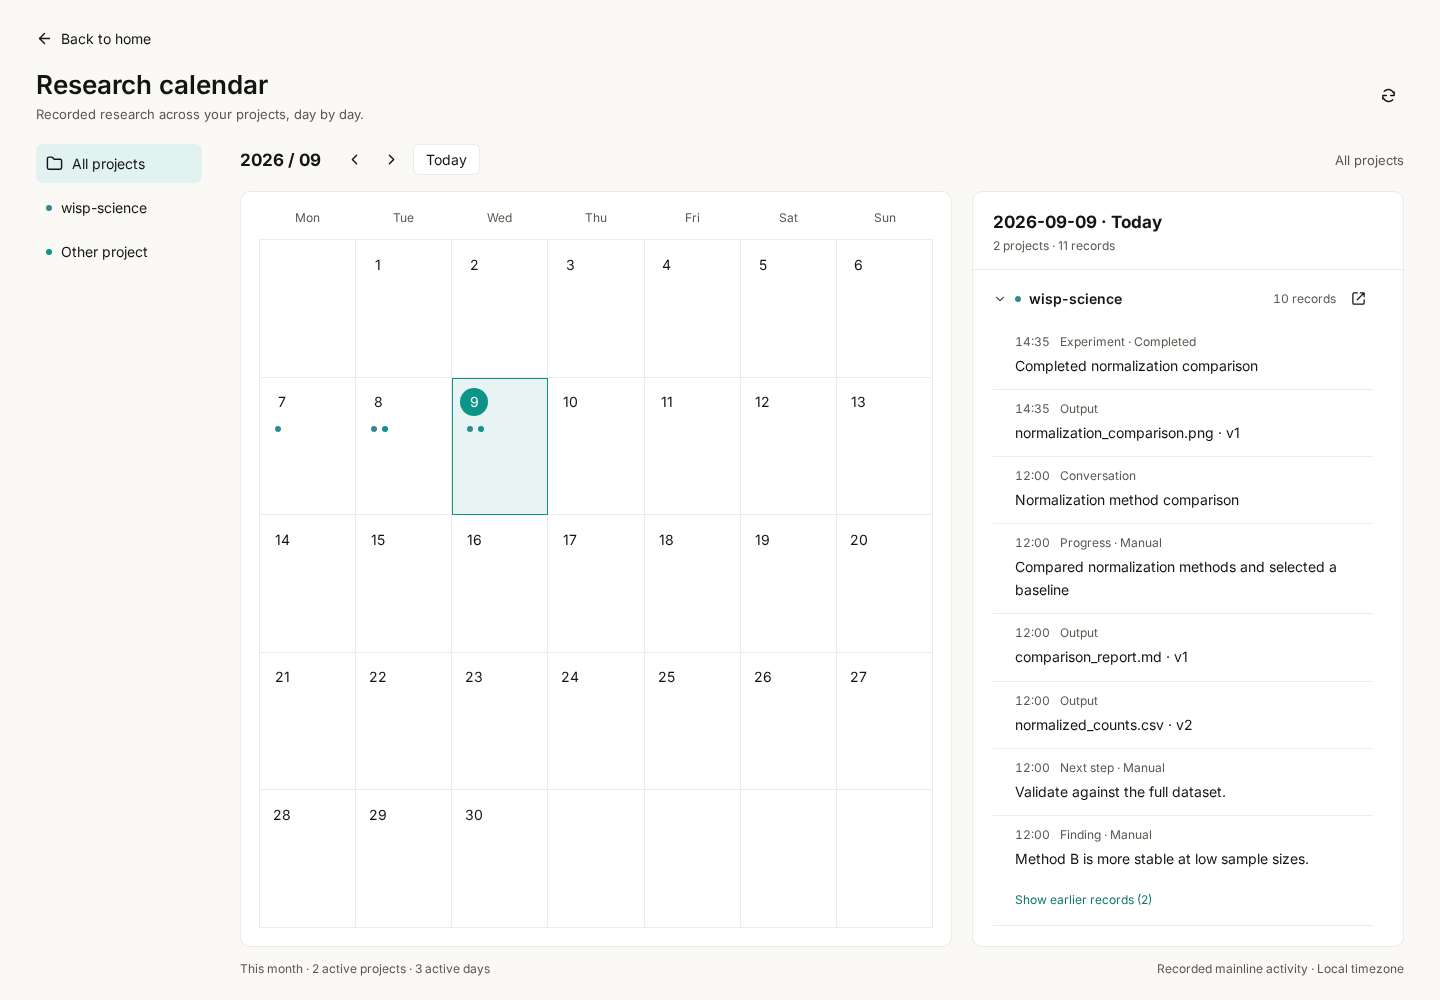
Try this sequence:
- Select a date with activity markers to see which projects have records.
- Select a project on the left to focus the view.
- For a busy day, expand a project group and use Show earlier records.
- Click the open icon to the right of the project heading in the day details to open that project's Research Journey at the selected date.
The month arrows show earlier or later months; Today returns to the current date. This calendar reflects recorded activity, rather than scheduling future tasks. Activity-day counts do not measure research completion. Projects hidden by privacy mode are excluded from the overview.
Step 2: Read a day in your project's history
You can also open a project and choose Research journey in its sidebar. Sidebar entry opens the current month with the most recent active day expanded. Entry from the home calendar opens the date you selected.
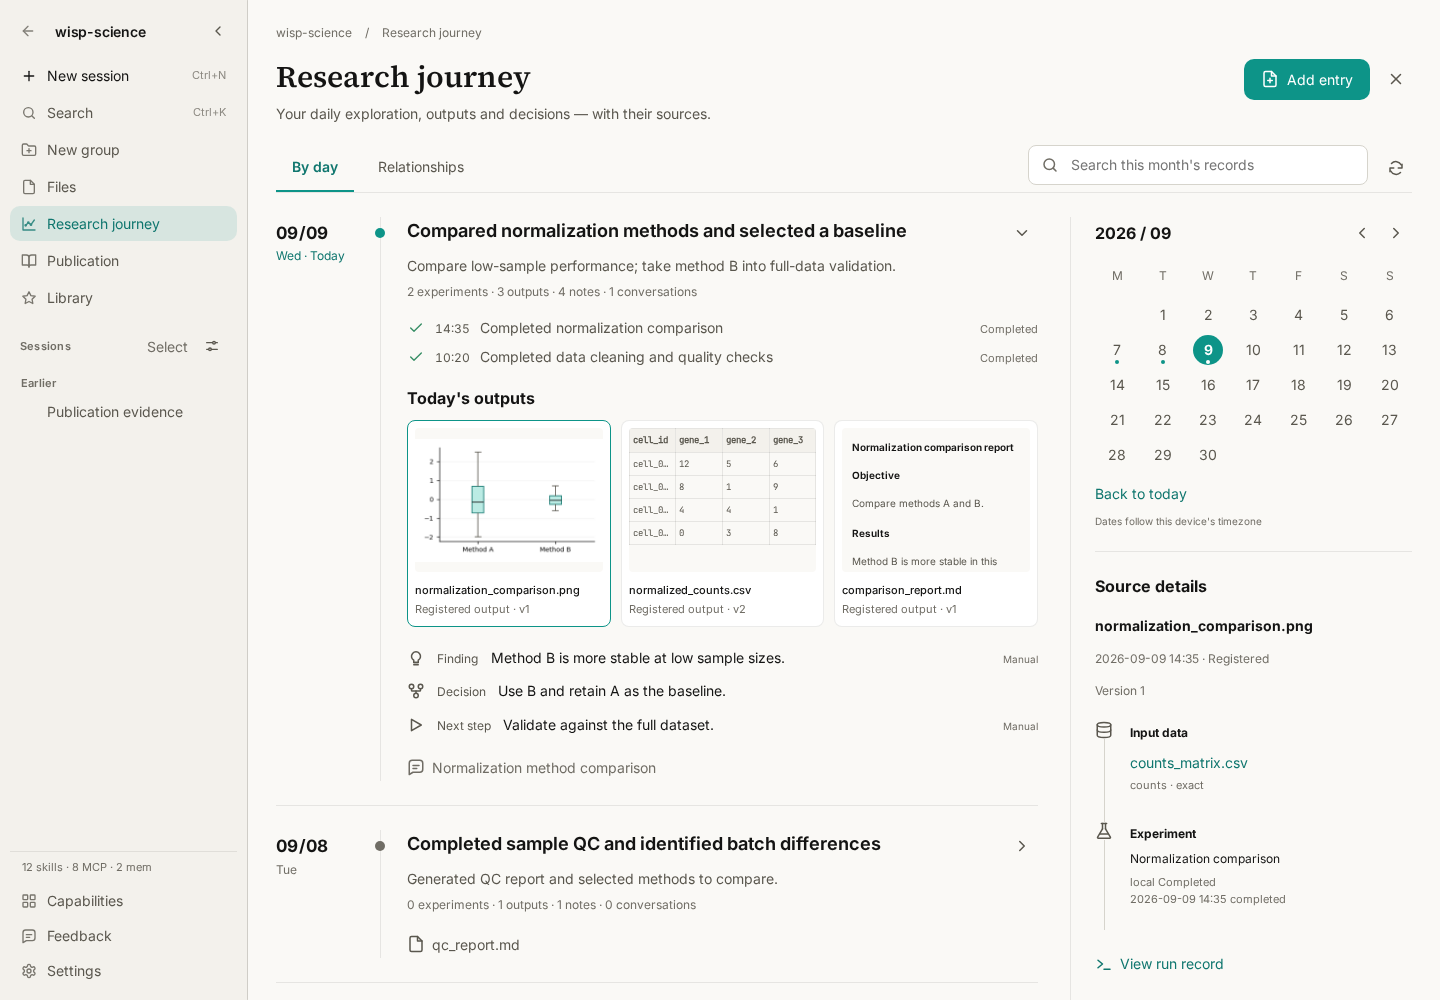
In the example, three days cover importing raw data, completing quality checks, and comparing normalization methods. Each day brings experiments, outputs, manual notes, and conversations together so you can review their context.
The view draws on existing project records: conversations, runs, registered outputs, papers, data assets, decisions, and manual notes. Failed or cancelled runs can also appear; understanding an unsuccessful attempt is useful when deciding what to try next.
Select a day in the calendar or choose Show full month to return to the monthly view. Search covers the currently loaded range, not every month in the project. If an older record is missing, navigate to its month or day first. If the page reports an incomplete read, narrow the range to one day.
Step 3: Trace an output to its source
Suppose you want to use normalized_counts.csv in a lab meeting. Its filename alone cannot tell you which analysis it belongs to.
Click that output in the daily card. The source panel shows its exact historical version, the producing run, and registered inputs when available.
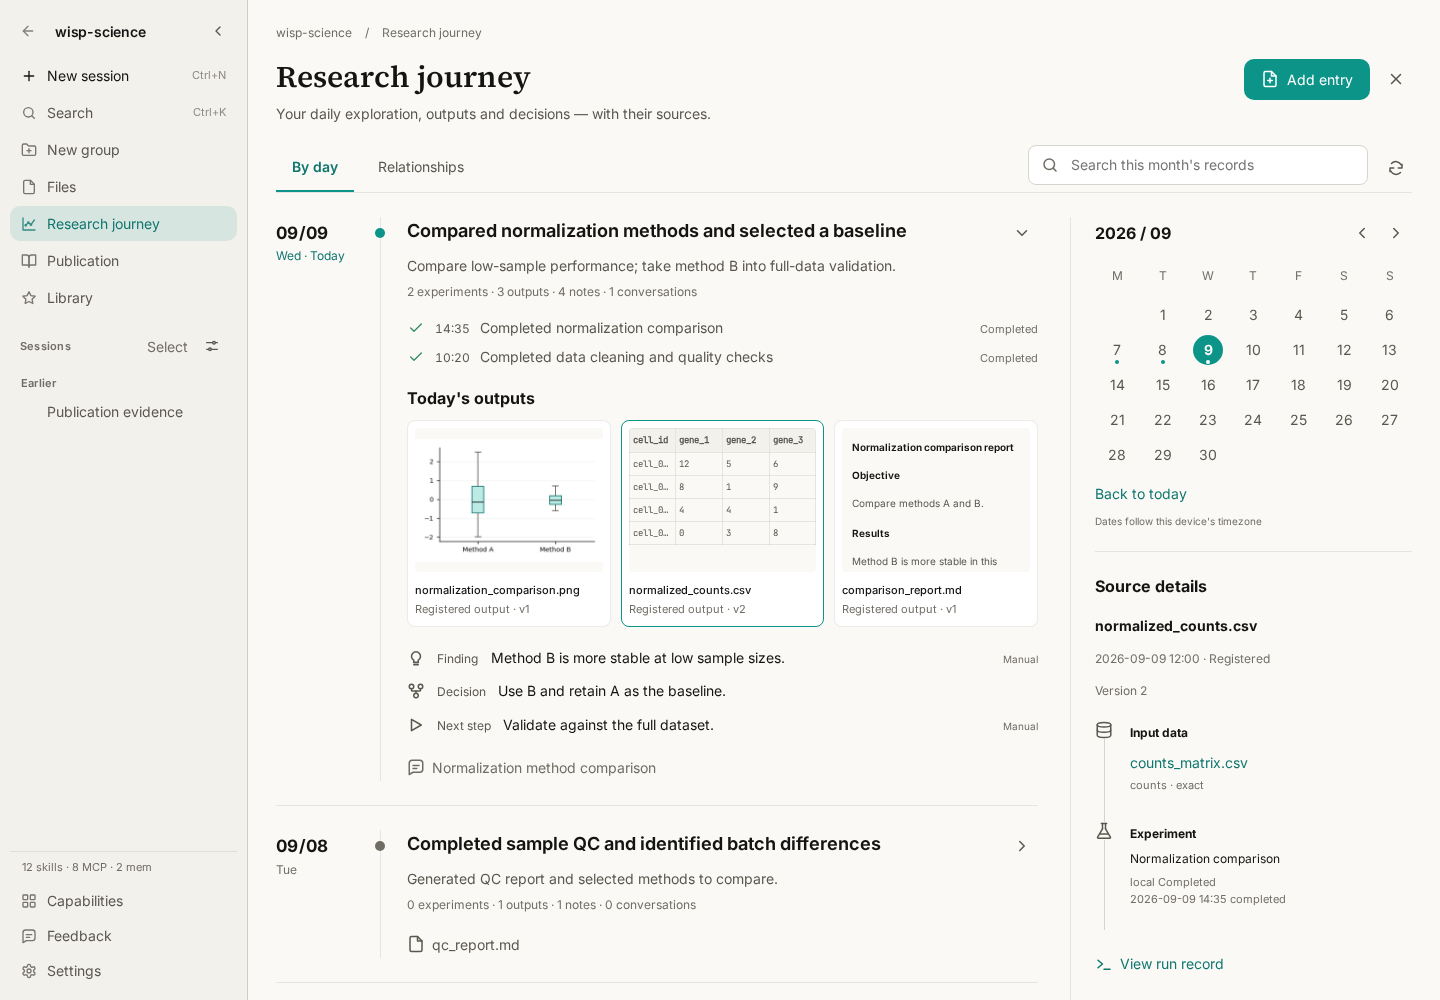
Check three things:
- Version: the card refers to the specific version registered at that time. A later file update does not silently replace it with the latest version.
- Inputs and run: check whether the analysis used the intended data. View run record shows status, command, execution context, and log tails.
- Content: choose Open output to inspect that version rather than relying only on its title or description.
Source details depend on what was registered. A “Not recorded” field does not establish a complete analysis history. An old file registered today does not automatically become an output from an earlier experiment.
Escape closes the topmost output preview or run dialog before exiting Research Journey.
Step 4: Record your judgment and next step
A run log can show what executed. Why you chose a method, or which findings remain uncertain, often needs a researcher's note.
Choose Add entry at the upper right, select the research date and category, and enter a title and details.
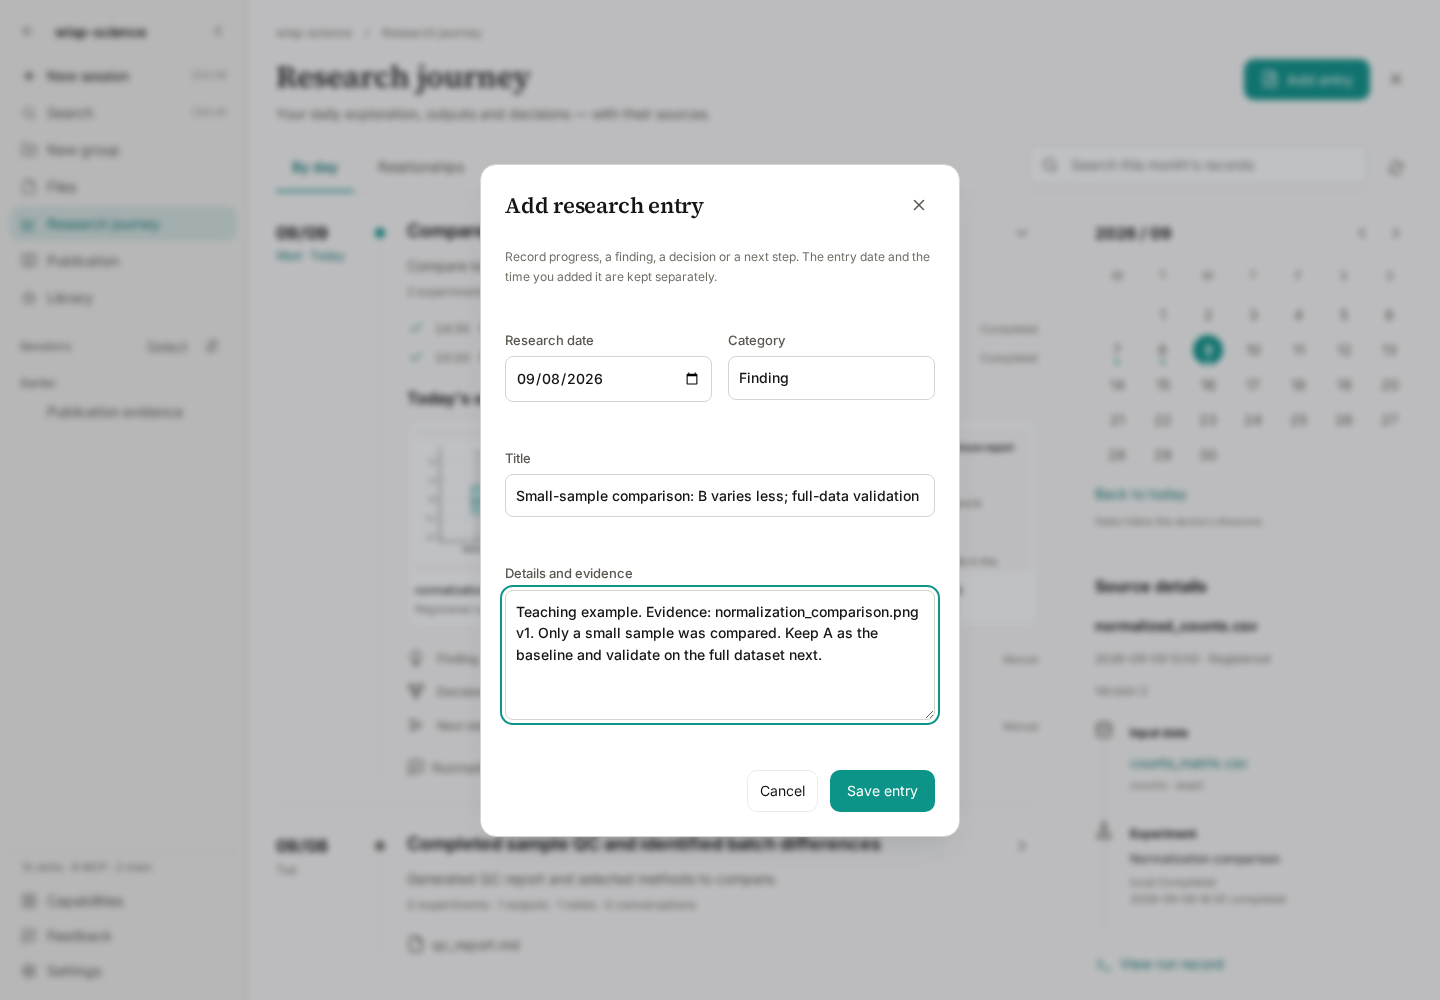
The four categories cover progress, findings, decisions, and next steps. Here is an example finding:
Title: Small-sample comparison: B varies less; full-data validation pending
Details and evidence: Teaching example. Evidence: normalization_comparison.png v1. Only a small sample was compared. Keep A as the baseline and validate on the full dataset next.
A useful note states what you observed, where the evidence is, and what remains untested. Saving places it under the selected research date. A backdated entry also retains the time when you actually added it.
Manual notes are not automatically scientifically verified. There is currently no entry editing or deletion control, so review the date and wording before saving.
Step 5: Select evidence that supports your manuscript
When preparing results for a paper, close Research Journey and choose Publication in the project sidebar.
This workspace organizes evidence around the manuscript. Its outline contains sections, claims, or figures; evidence cards show selected results, analysis lineage, and the recorded purpose or selection rationale. The page also includes Finalization check and Version history.
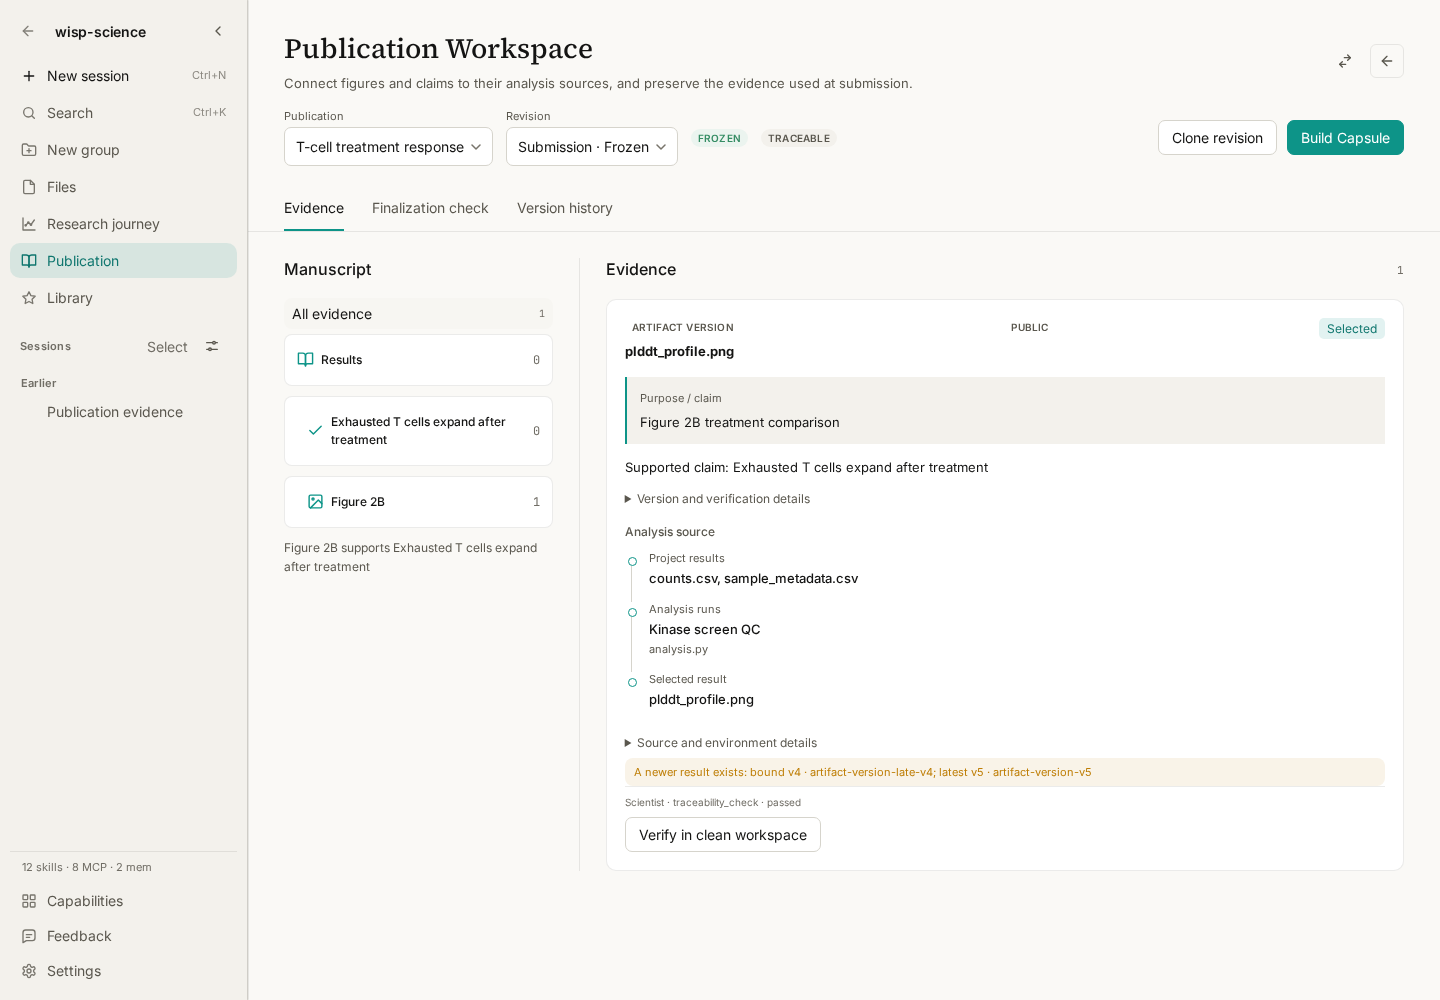
For an editable draft:
- Create or select a publication and draft revision, then add the section, claim, or figure you want to support.
- Choose Add evidence and select registered results, analysis runs, or saved research conversations.
- Record the purpose, selection state, and any needed rationale. Conversation sources support passage selection; file sources bind the exact version selected.
- Use Finalization check to inspect the revision and address its findings. After a successful check, explicitly confirm and lock the evidence.
Passing a check does not automatically lock the draft. Locking is a separate action. Version history opens the stored revision; clone a new revision to continue editing. The calendar and notes do not automatically select manuscript evidence for you.
For revision, capsule, and verification details, see the Publication Evidence Workspace guide.
A small daily habit
At the start of work, use the calendar to review yesterday and find the questions still awaiting validation. Before finishing, open today's Research Journey, check the versions and sources of key outputs, and add a note with evidence and a next step.
When a meeting or manuscript deadline arrives, follow the dates back to the original results, runs, and reasoning. The context available still depends on the outputs, inputs, and notes you actually registered. Wisp does not automatically generate daily scientific summaries or treat every file in a directory as a research result.
A trace for every day of discovery.
Project and downloads: Wisp Science · v1.11.0
Continue reading: Quick Start · Trajectories · Import, Export, and Sharing