
Wisp Science基础入门:模型配置
查看原文第一次打开 Wisp Science,很多人会停在同一个地方:我已经有一个 AI 账号了,为什么还要填写 API 地址和密钥?模型名称该填什么?保存后,又怎样知道这次对话真的用上了它?
Wisp Science 把科研工作区与模型接入分开管理。你可以保留同一个项目中的文件和分析记录,再按需要选择能够访问的模型。这篇文章从第一次接入讲起,先完成一个能正常回答的小任务,再认识图片能力和会话切换。
本文配图来自 Wisp Science 实际前端,使用演示配置和教学会话。图中的模型列表不代表推荐顺序,也不表示已经验证了某个账号的访问权限;请以自己的服务商提供的配置为准。
先分清三件事:Wisp、模型服务和 API 密钥。
| 组成部分 | 负责什么 | 你需要准备什么 |
|---|---|---|
| Wisp Science | 管理项目、组织对话与工具调用、保存工作记录 | 安装应用并打开一个项目 |
| 模型服务 | 接收请求,生成回答或工具调用 | 可访问的服务地址、支持的协议和模型 ID |
| API 密钥 | 让服务商识别这次请求使用的账号或额度 | 服务商控制台提供的 API Key |
网页登录账号、聊天订阅和 API 使用权限可能采用不同的开通方式。能在某个网站聊天,并不一定意味着已经有可供 Wisp 使用的 API 密钥。开始前,先确认你拿到的是 API 接入信息。
如果实验室提供统一网关,也可以使用管理员给出的地址、模型 ID 和密钥。不要把网页聊天地址填进 API 地址栏。
打开模型设置,先看自己是否已有可用配置。
进入 设置 → 模型。这里可以查看已有模型,也可以点击 添加 API 接入。首次引导中的模型配置是另一个起点;跳过引导后,仍可以随时回到这里补充。
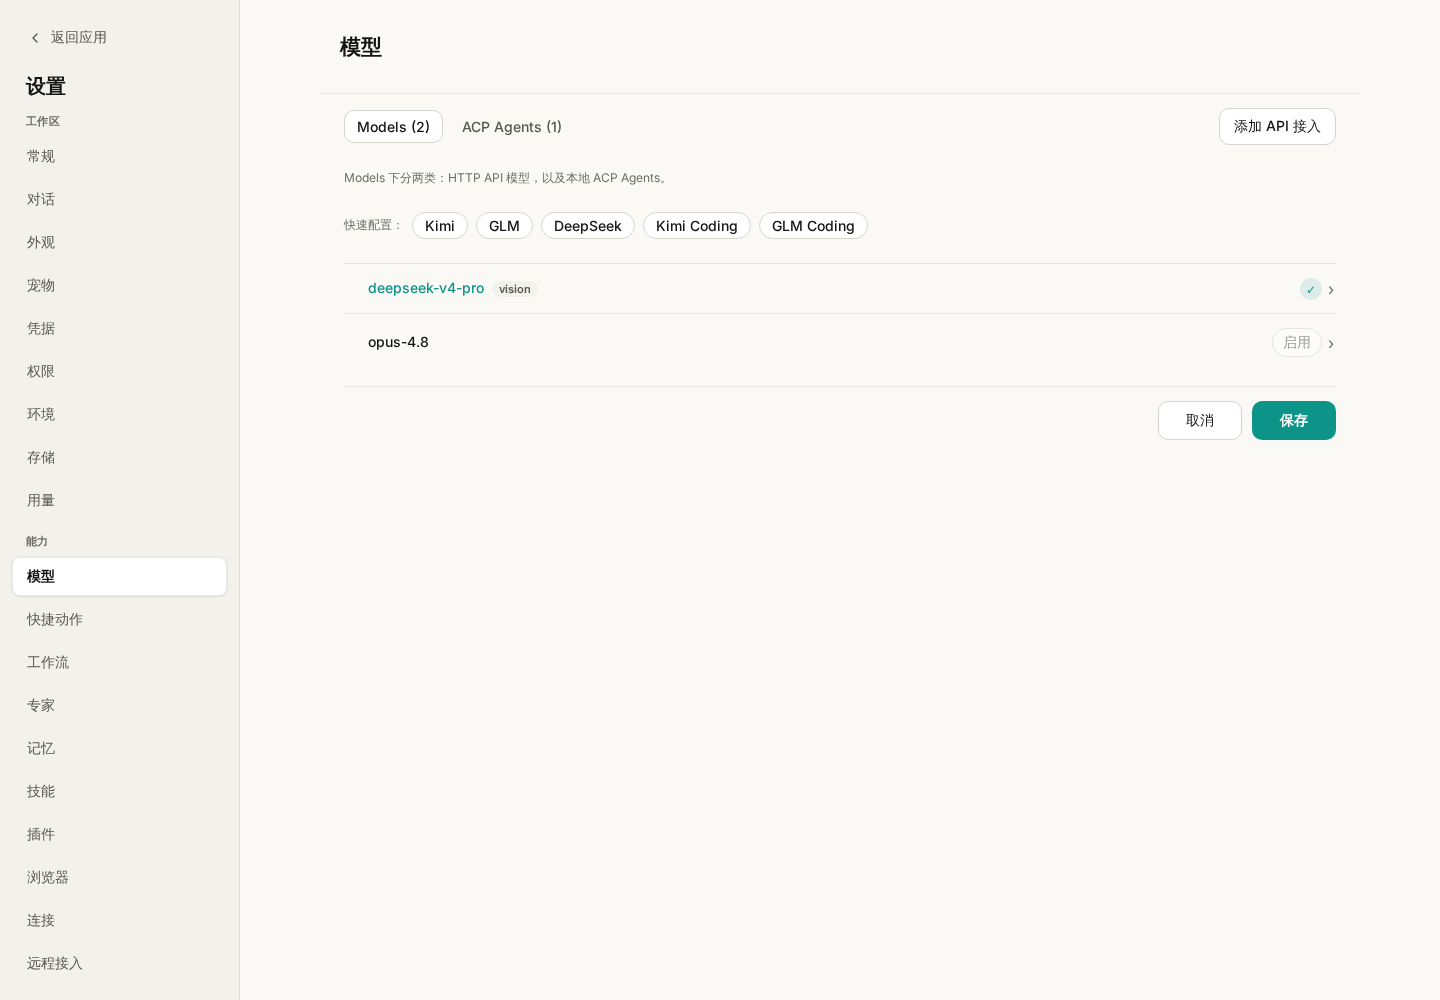
图 1:先检查已有模型。显示名称便于自己区分用途,实际调用仍依赖模型 ID、协议和地址。
这个页面也有 ACP Agents 分类,用来接入外部 Agent 进程。本文先介绍 Wisp 内置 Agent 使用的 HTTP API 模型。手里拿到的是命令行启动命令时,应查看 ACP 配置说明。
添加 API 接入,先填写共用信息,再添加模型。
点击 添加 API 接入,先填写服务商给出的 Base URL 和 API 密钥,然后在下方填写这把密钥可以调用的模型。一组接入可以添加多个模型,每个模型分别选择协议、模型 ID 和能力。
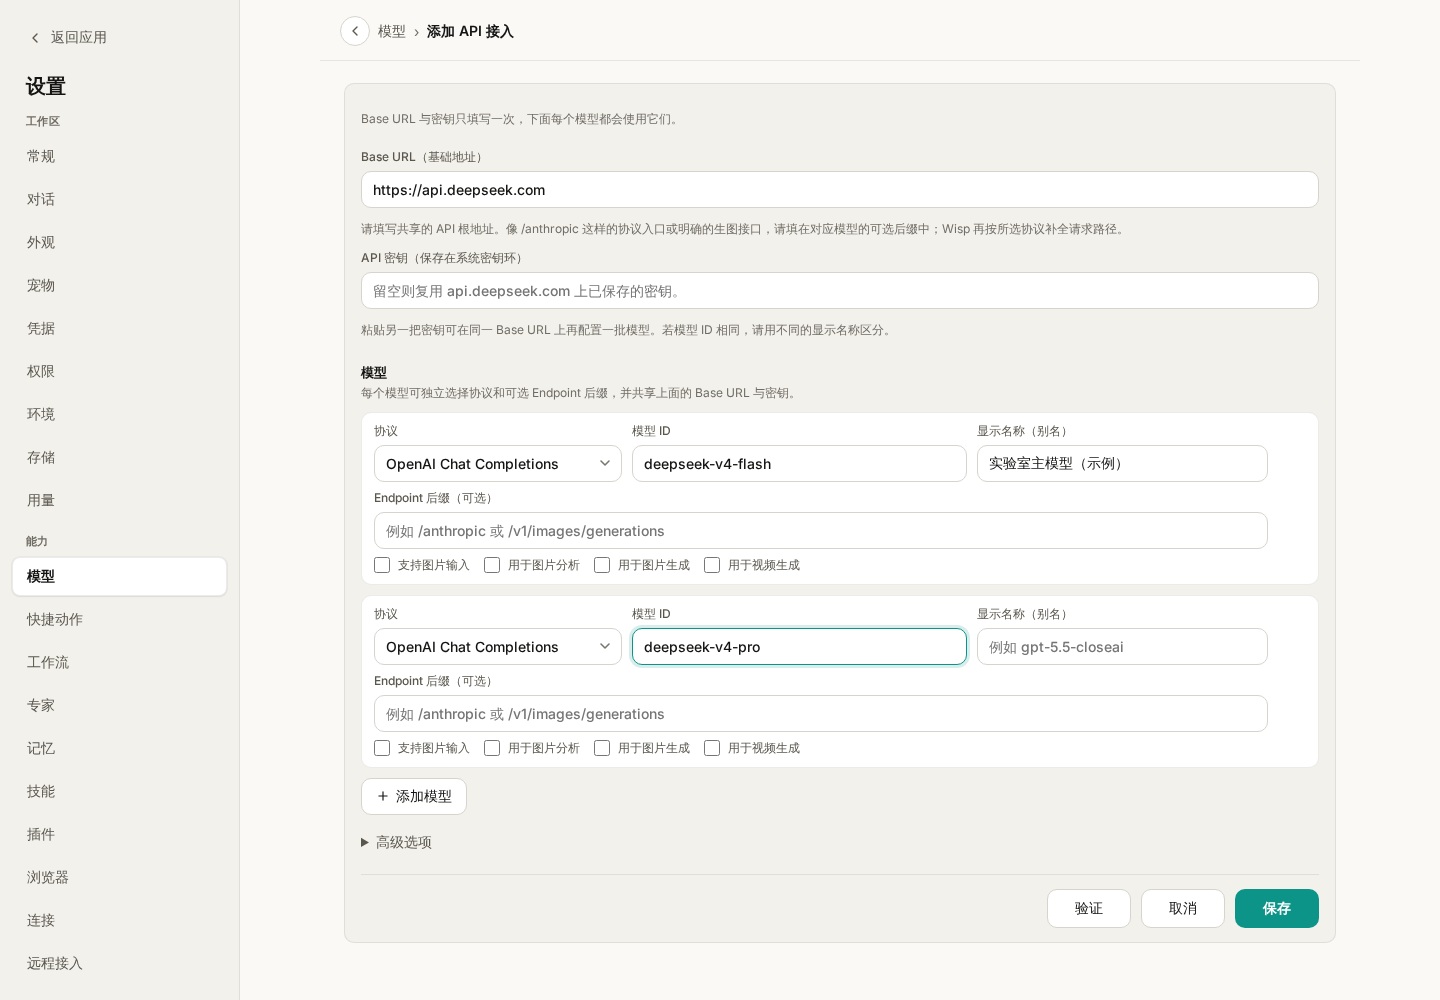
图 2:同一次添加中的模型共用地址和密钥。截图仅演示字段位置,密钥没有填写。自动建议的模型也要与自己的账号权限核对。
首次接入时,优先把下面几项填准确:
| 字段 | 怎样填写 | 容易混淆的地方 |
|---|---|---|
| Base URL | 服务商提供的 API 基础地址 | 通常不要自行追加 /v1/chat/completions 等完整接口路径 |
| API 密钥 | 服务商控制台生成的密钥 | 不要填写网页登录密码 |
| 协议 | 按服务商说明选择 OpenAI 兼容、OpenAI Responses 或 Anthropic | “OpenAI 兼容”是一种接口格式,也可由其他服务商提供 |
| 模型 ID | 服务实际接受的精确名称 | 显示名称可以自定义,模型 ID 不能随意起名 |
| 显示名称 | 便于识别的名称,例如“实验室主模型” | 不会改变实际调用的模型 |
| 端点后缀 | 服务商明确要求的额外路径 | 一般先留空,不要把完整接口路径反复拼接 |
如果不确定协议和地址是否配套,把这两个字段一起与服务商文档核对。不要一遇到报错就轮流追加 /v1、/responses 和 /messages。
首次使用这组地址时,需要提供有效密钥。已经为相同 Base URL 保存过密钥时,留空可以复用已有密钥;粘贴另一把密钥,可以为新的模型组建立独立接入。同一个模型使用不同账号时,建议设置不同显示名称,便于在对话中识别。
Wisp 把 API 密钥放在操作系统密钥环中。截图、项目笔记和发给同事的配置说明里,只保留地址、协议和模型 ID,不要附上真实密钥。
填写完成后,点击 验证,再按结果核对配置;验证成功后仍需点击 保存。以后也可以打开已保存模型的编辑页重新验证。验证通过说明对应检查成功,具体的工具调用或图片任务仍需要各自试用。
输出长度和上下文窗口,先使用有依据的数值。
接入保存后,点击模型列表中的具体模型,可以在编辑页调整输出长度、上下文窗口和推理等设置。
“最大输出 tokens”约束一次回答最多生成多少内容;“上下文窗口”描述模型能够处理的输入与输出总范围。它们不是填得越大,模型能力就越强。
Wisp 对内置模型目录能够精确识别的模型,会带出已记录的上限。目录没有识别到自定义别名或网关模型时,需要按服务商说明填写。最大输出超出已知上限时,保存会提示错误;上下文窗口超过已知上限时会被收回上限。
推理强度、Fast 模式等选项也依赖模型和服务商支持。第一次接入可以保留默认,先确认普通对话成功,再根据实际任务调整。Fast 模式可能影响额度消耗,开启前查看所用服务的说明。
回到对话,明确选择这次要用的模型。
打开一个新会话,在输入框附近的模型选择器中选择刚保存的模型。
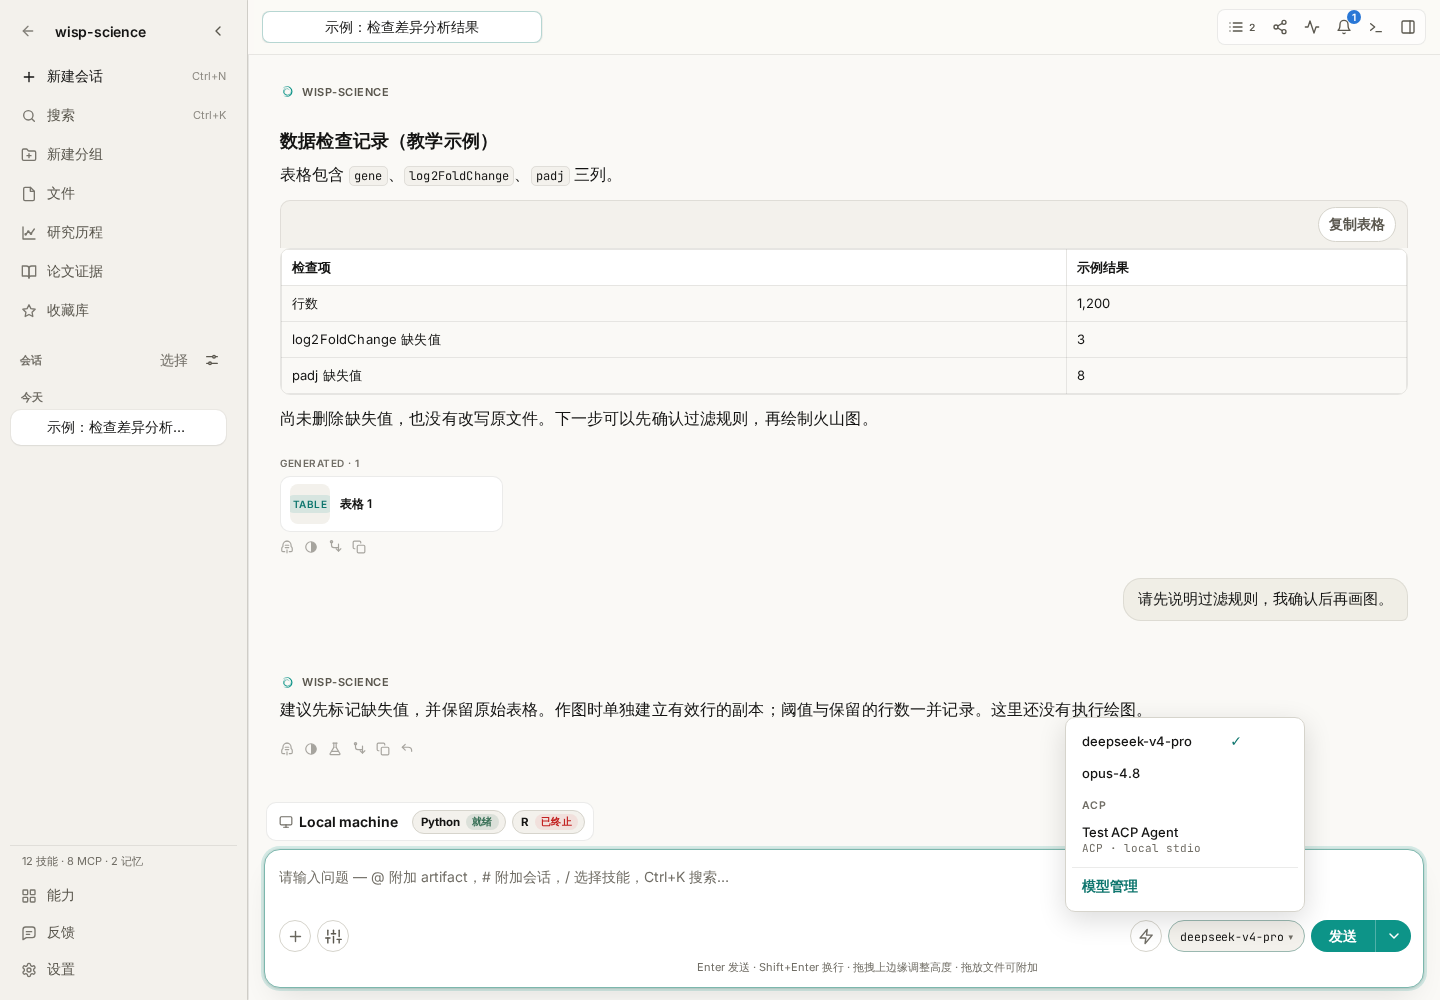
图 3:这里决定当前会话使用的模型。已有消息的会话切换模型时,会出现确认提示;设置中的默认模型用于新会话。
先发送一条不依赖网络和科研工具的小问题:
请用三句话解释 CSV 文件是什么,再给出一个两行数据的 CSV 示例。此次不需要读取文件或访问网页。
这样比较容易区分“模型是否能回答”和“外部工具是否配置成功”。收到正常回答后,再尝试读取自己项目中的一个小文件。
不要只问“你是什么模型”来验证配置。模型在自然语言中的自我描述不能替代实际配置记录;应检查选择器显示的模型,并结合该轮的轨迹与用量记录核对。
已有内容的会话切换模型,会影响这个会话后续的请求;一轮已经发出的请求仍使用启动时的配置,新配置从后续轮次生效。
需要读图时,再检查图片输入和图片分析角色。
科研任务经常包含显微图片、截图或统计图。模型能回答文字,不代表它能接收图片。
- 使用支持视觉输入的聊天模型时,勾选 支持图片输入。
- 希望它也为非视觉主模型解释图片时,再指定 用于图片分析。
- “用于图片生成”是另一个角色,负责产出图像,不能代替图片分析配置。
可以上传一张没有敏感信息、标注清晰的简单图,发送:
请只描述这张图中能看见的坐标轴、图例和变化趋势。看不清的文字请明确说明,不要补写实验条件,也不要推断因果关系。
先验证可见信息,再进入具体科研判断。如果选择的主模型不能读图,也没有可用的图片分析模型,先补齐配置,再重试。
遇到报错,先从出错的位置排查。
| 现象 | 优先检查 |
|---|---|
| 401 / 403 | 密钥是否有效、API 权限是否开通、账号能否访问该模型 |
| 404 或返回网页内容 | Base URL、协议与模型 ID 是否正确;是否误填了服务首页 |
| 超时或连接失败 | 网络连通性,以及 设置 → 常规 → 网络 中的模型 API 代理 |
| 验证通过,某个任务仍失败 | 该模型是否支持任务所需的工具调用、图片输入或输出长度 |
| 上下文超限 | 尝试 /compact,或开新会话并说明需要延续的任务 |
| 回答中途截断 | 核对最大输出设置,必要时使用“继续执行”或缩小本次任务 |
第一次配置的目标可以很小:保存一组接入,在新会话中选择它,得到一条完整回答。这个环节跑通后,再接着学习 MCP、Skills 和浏览器使用,就更容易判断后续问题出现在哪一层。
功能细节参见 Wisp 模型配置文档。本文依据撰写时的项目实现整理,不同版本的界面文字可能略有差异;示例提示词不代表已经执行的模型请求。
When you first open Wisp Science, you may wonder why it asks for an API address and key when you already have an AI account. Which model name should you enter? After saving it, how do you know the conversation uses that model?
Wisp Science manages your research workspace separately from model access. Keep the same project files and analysis records while selecting among models you can access. This tutorial starts with a working first connection, then introduces image capabilities and switching models.
Screenshots come from the real frontend with demonstration settings and conversations, using the English interface. The model list is not a ranking or proof of access for an account. Follow the configuration supplied by your provider.
Understand the app, model service, and API key.
| Component | Responsibility | What you need |
|---|---|---|
| Wisp Science | Projects, conversations, tool calls, and work records | Install the app and open a project |
| Model service | Receive requests and generate replies or tool calls | A reachable address, supported protocol, and model ID |
| API key | Identify the account or quota used for a request | A key from the provider's console |
Website logins, chat subscriptions, and API access may be provisioned separately. Being able to chat on a website does not necessarily mean you have an API key for Wisp. Confirm that you have API access details.
A laboratory gateway also works when you use the address, model ID, and key supplied by its administrator. Do not put a web-chat URL in the API address field.
Open Models and check existing configurations.
Go to Settings → Models. Review existing models or click Add API access. Model setup in onboarding is another entry point; skipping it does not prevent you from configuring a model here later.
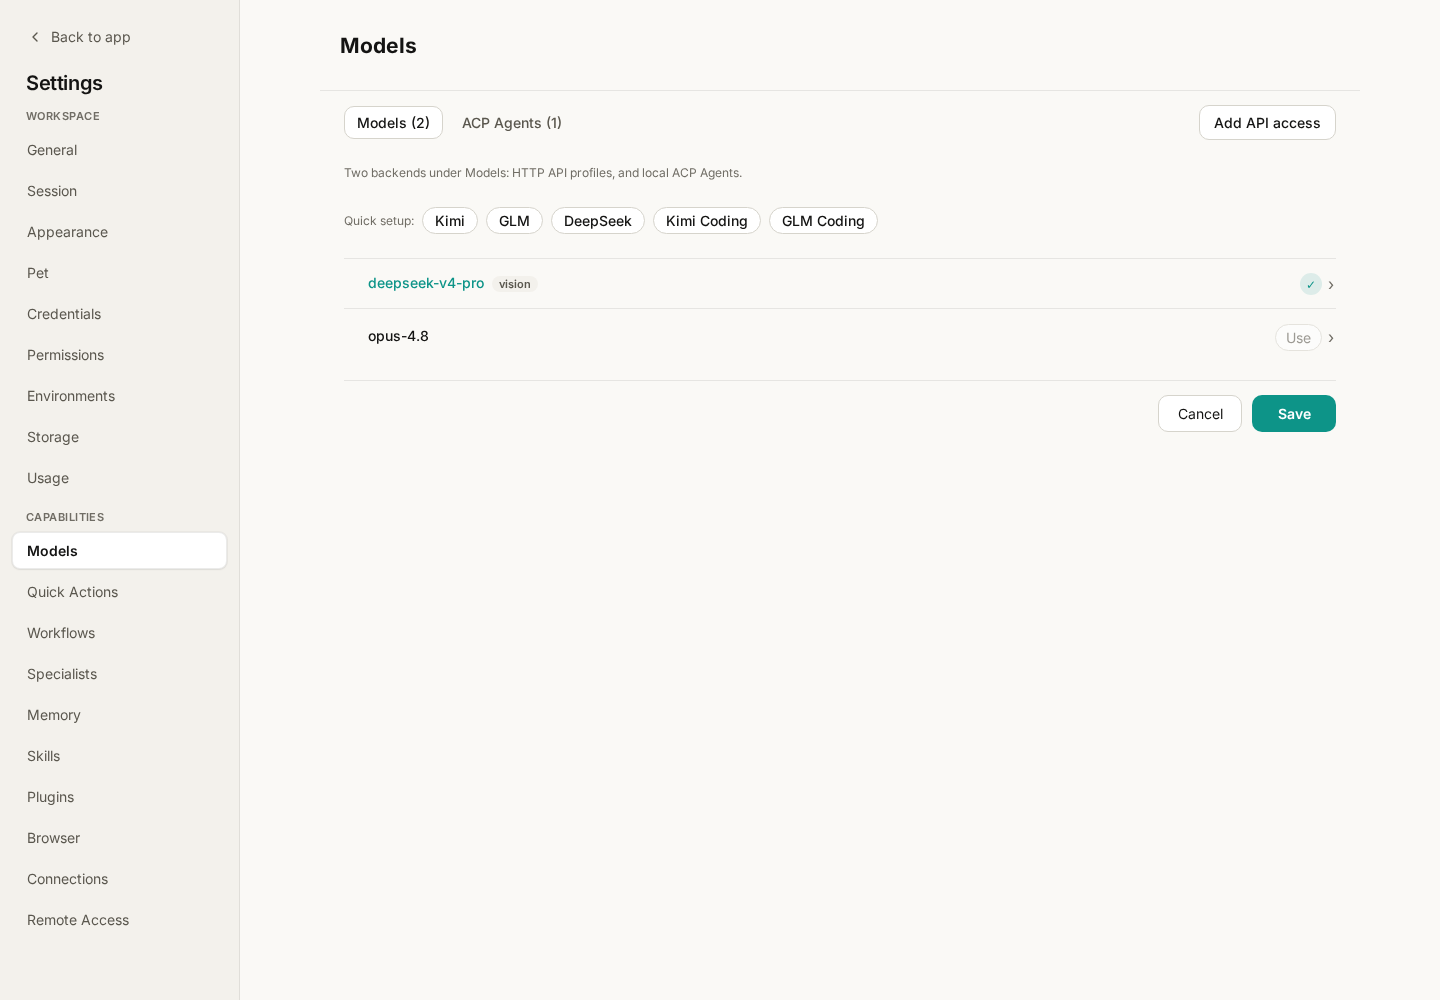
Figure 1: Check existing models first. A display name helps identify a model's purpose; requests still depend on its model ID, protocol, and address.
The same page has an ACP Agents category for external agent processes. This tutorial covers HTTP API models used by the built-in Wisp agent. If your setup instructions provide a process launch command, see ACP configuration.
Enter shared API access, then add its models.
Click Add API access and enter the provider's Base URL and API key. Add the models this key can call below. One API access form can contain multiple models, each with its own protocol, model ID, and capabilities.
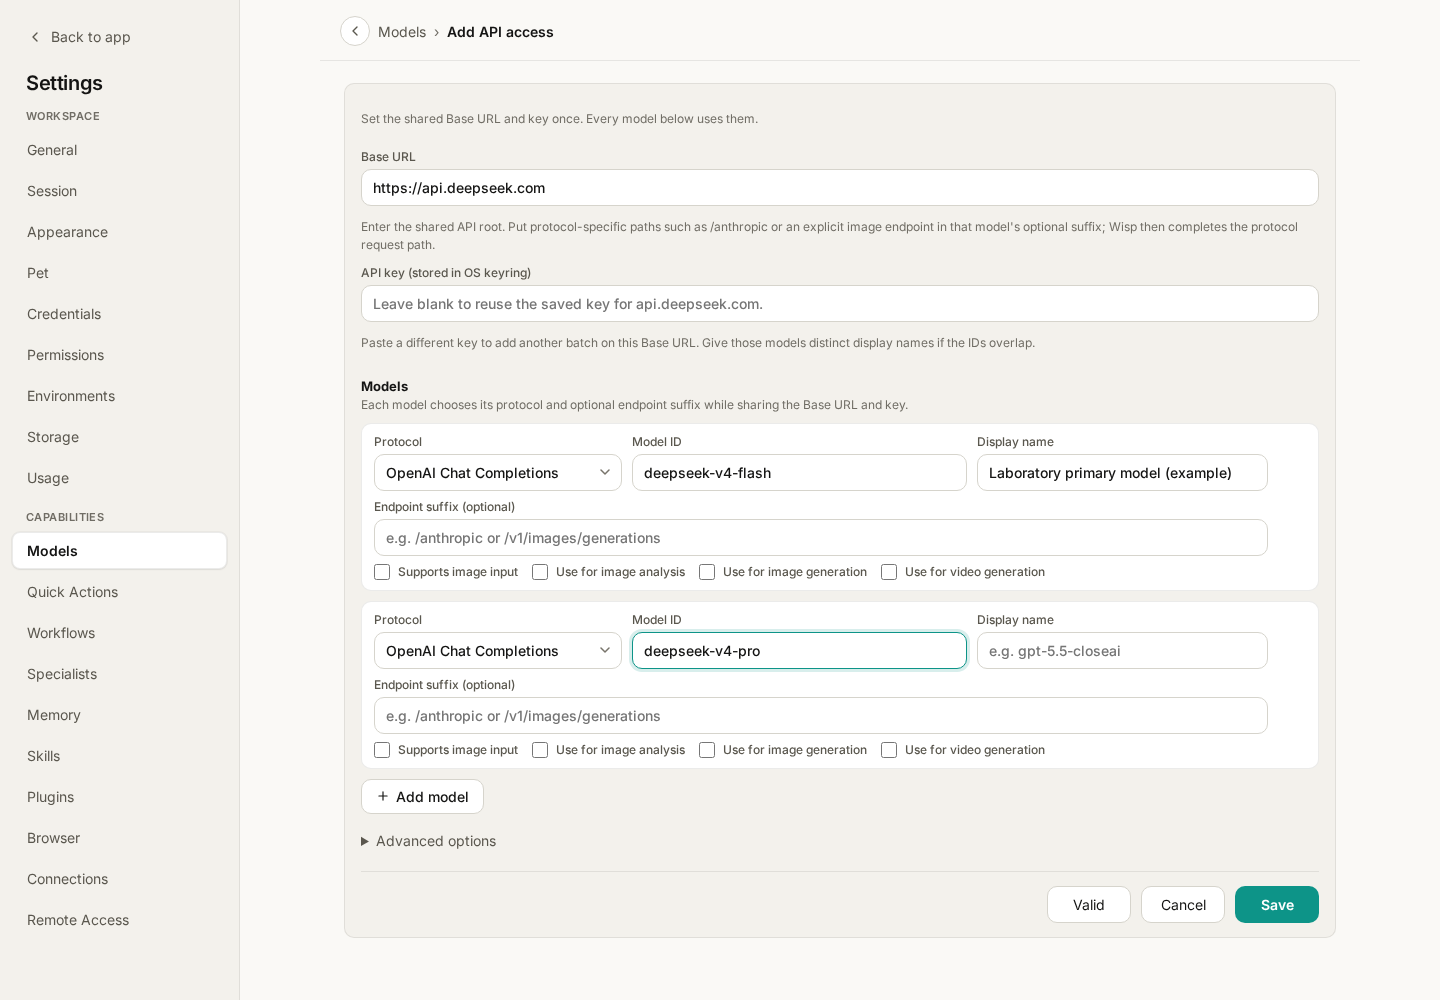
Figure 2: Models added together share the address and key. The screenshot illustrates the fields without exposing a key. Check suggested models against your account's permissions too.
Get these fields right first:
| Field | What to enter | Common confusion |
|---|---|---|
| Base URL | The API base address supplied by the provider | Usually do not append a complete route such as /v1/chat/completions yourself |
| API key | A key generated in the provider console | It is not your website login password |
| Protocol | OpenAI-compatible, OpenAI Responses, or Anthropic, as documented by the provider | OpenAI-compatible describes an interface that other providers may implement |
| Model ID | The exact name accepted by the service | A display name is customizable; the model ID is not arbitrary |
| Display name | A recognizable label, such as Laboratory primary model | This does not change the model called |
| Endpoint suffix | An extra path explicitly required by the provider | Usually leave it empty rather than repeatedly appending complete routes |
If uncertain, check the protocol and base address together against the provider's documentation. Do not cycle through appending /v1, /responses, and /messages whenever an error occurs.
A new address needs a valid key. If a key is already stored for that Base URL, leaving the field empty can reuse it. Pasting another key creates separate access for the new model batch. Use distinct display names when the same model is accessed through different accounts.
Wisp stores API keys in the operating system keyring. Share the address, protocol, and model ID in screenshots or configuration notes, but leave out the actual key.
Click Validate, inspect the result, and then click Save after validation succeeds. Validation does not replace saving. You can validate again from a saved model's edit page. Passing this check does not replace testing specific tool-calling or image tasks.
Use documented output and context limits.
After saving access, click an individual model in the list to edit output length, context window, reasoning settings, and related options.
Max output tokens limits the content generated in one response. Context window describes the overall input-and-output capacity. Increasing these numbers does not make the model more capable.
For exact IDs recognized by the built-in model catalog, Wisp supplies the recorded ceilings. For an unknown alias or gateway model, enter limits documented by the provider. Saving output above a known ceiling produces an error; an oversized context setting is clamped to the known limit.
Reasoning effort and Fast mode also depend on provider and model support. Leave defaults in place for the first test, then adjust them for actual tasks. Fast mode may affect quota usage; check your service's description before enabling it.
Choose the model for this conversation.
Open a new conversation and select the saved model in the picker near the message box.
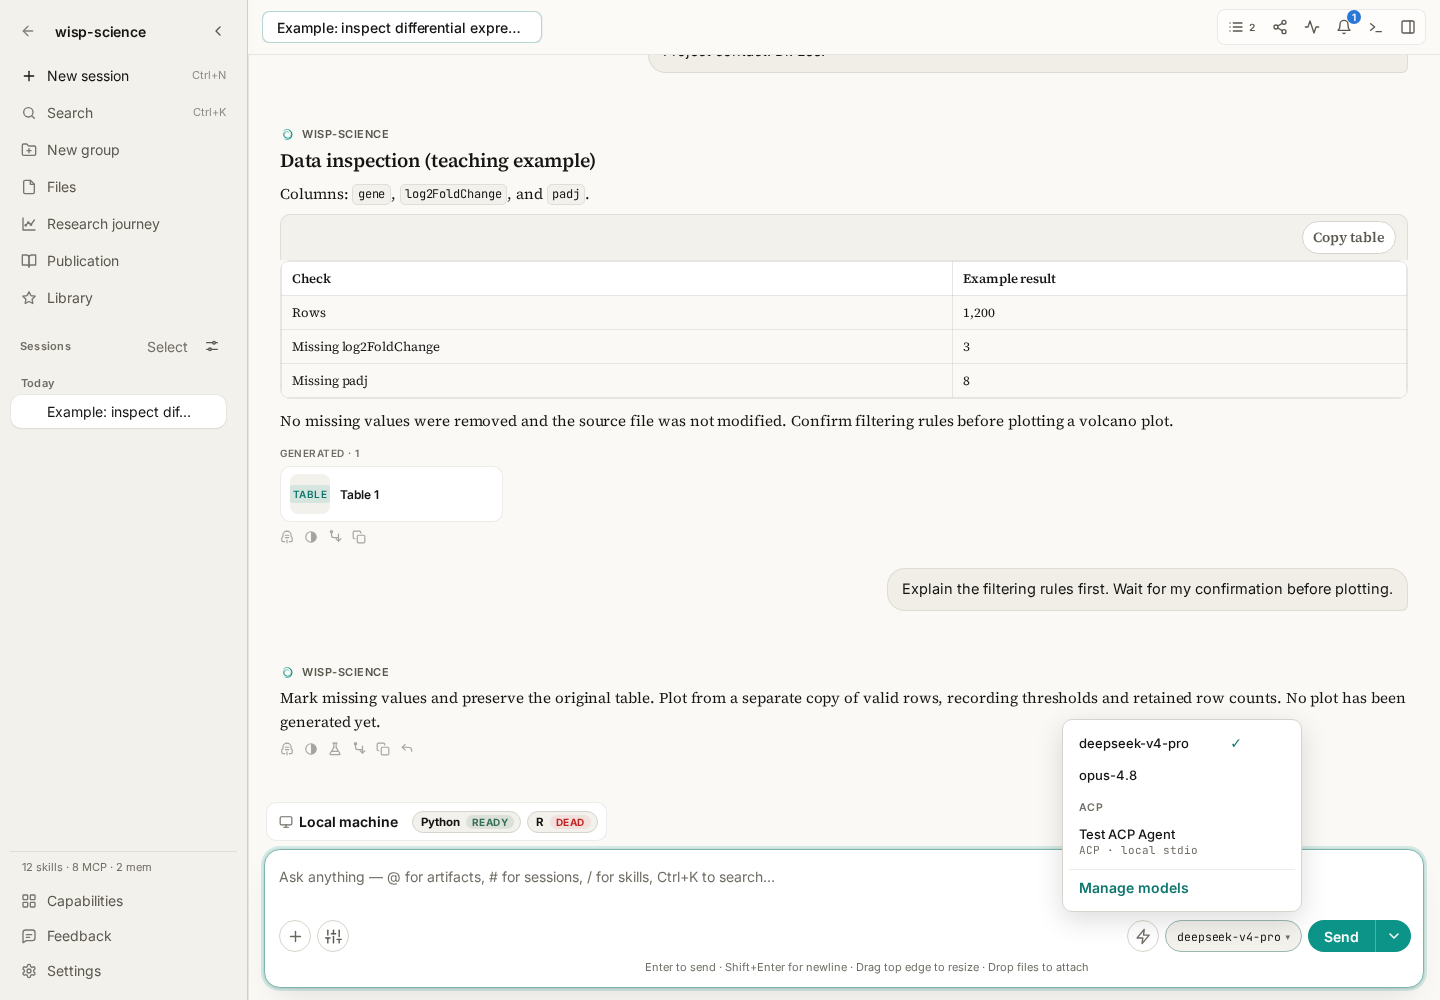
Figure 3: This picker selects the current conversation's model. Switching a conversation that already has messages requests confirmation. The model default in Settings is used for new conversations.
Start with a small question that does not require the web or research tools:
Explain CSV files in three sentences, then give a CSV example with two data rows. Do not read files or visit websites for this task.
This helps distinguish a model connection problem from an external-tool setup problem. After a complete response, try a small file from your project.
Asking “What model are you?” is not sufficient verification: a model's natural-language self-description does not replace configuration records. Check the picker and, where available, the turn's trajectory and usage records.
Switching a populated conversation changes subsequent requests for that conversation. A request already running continues with the configuration used when the turn started; the new configuration takes effect on later turns.
Configure image input and image analysis when you need them.
Research often involves microscopy images, screenshots, and plots. Text responses do not establish that a model accepts images.
- Enable Supports image input for a chat model with vision support.
- Assign Use for image analysis if it should also describe images for a non-visual primary model.
- Use for image generation is a separate role that produces images; it does not replace image analysis.
Upload a simple, clearly labeled image without sensitive information and try:
Describe only the visible axes, legend, and trends. Identify any text you cannot read. Do not invent experimental conditions or infer causality.
Verify visible information before moving to scientific interpretation. If the primary model cannot read images and no image-analysis model is available, configure the missing capability before retrying.
Troubleshoot where the failure occurs.
| Symptom | Check first |
|---|---|
| 401 / 403 | Key validity, enabled API access, and permission for this model |
| 404 or webpage content | Base URL, protocol, model ID, and whether a website homepage was entered by mistake |
| Timeout or connection failure | Connectivity and the model API proxy in Settings → General → Network |
| Validation succeeds but a task fails | Support for the task's tool calls, image input, or response length |
| Context limit exceeded | Try /compact, or start a new session explaining what should be continued |
| Reply is cut off | Check maximum output, use Resume if appropriate, or reduce the scope of this request |
A first configuration can have a small goal: save one connection, select it in a new conversation, and obtain a complete response. Then explore MCP, Skills, and Browser, with a clearer idea of where a later problem occurs.
See Model Configuration for details. This tutorial reflects the implementation when written; labels may vary between versions. Example prompts do not represent model requests that have already been executed.